Nothing can sour your morning quite like watery shots. Watching your watery espresso trickle down into a shot glass can lead to massive frustration, especially when the cause of your inconsistent and watery shots is a big unknown.
We will discuss five common reasons why your equipment is underperforming, but first, let’s review the basics for a moment to ensure your watery shots aren’t due to a simple user error—not that you don’t know what you’re doing.
Key Takeaway💭
Watery Espresso Solution: Elevate your espresso by incorporating fresh beans, going for a darker roast, optimizing grind size, keeping an eye on temperature, using a scale for measurement, tamping effectively, recording pull time, and examining spent pucks.
Dose
The “dose” refers to the amount of coffee grounds you measure into the espresso basket before pulling your shots. Keeping your basket clean and dry is vital for your espresso machine to function at its full capacity.
If you are unsure how much espresso to use, first decipher the size of your espresso basket (single, double, or triple). Once you know what size basket you are dealing with, follow this measurement guide:
- Singe basket: 8 to 10 grams
- Double basket: 16 to 18 grams
- Triple basket: 20 to 22 grams
Yield
The “yield” is the measurement in grams of your liquified espresso. The yield and dose are often grouped together to form the “brew ratio.” Typical brew ratios range from 1:1 to 1:3. To be clear, the dose is the weight of the grounds that go into the espresso basket, and the yield is the weight of the liquified espresso you end up with.
The first number represents the dose, and the second is the yield. An example of a 1:2 ratio is 20 grams of ground coffee to 40 grams of liquid espresso. A 1:3 ratio, sometimes known as “Lungo,” or a long shot, utilizes more water than is typical. If you are pulling long shots, then tweak your brew ratio a bit. This could be a quick fix if they seem watery.
Time
The “time” is the number of seconds your machine takes to produce your espresso shot. The amount of time your machine takes to pull a shot can significantly change the taste of your espresso.
As a rule, keep your shots in the 25 to 30-second range. And to adjust the pull time, you must play around with the size of your grind. If your shots are pulling too quickly, then grind your beans finer. If the opposite is happening, go courser.
Common Reasons Your Espresso is Watery
Now that we know the measurement, ratio, and time are not the causes of our watery shots, perhaps one of these five common causes is the culprit:
- Your beans are not fresh, or your roast is too light
- The grind size is off, and your pull time is too long
- You are not using a scale
- The temperature is set incorrectly
- You are not tamping correctly, and your spent puck looks wrong.
Your beans are not fresh, or the roast is too light.

The freshness and quality of your beans is vital to producing high-quality shots. Don’t forget to check the roast date. Your espresso beans should be used between 5 and 15 days after being roasted. Avoid purchasing pre-ground beans because you can’t adjust the grind size, and pre-ground beans result in a less flavorful shot.
Lastly, think about switching to a darker roast if your current roast is on the lighter side because a darker one will have more flavor and a better body.
The grind size is off, and your shots are pulling too long.
Imagine two cups. One cup is full of sand, while the other is filled with rocks. Think about what would happen if you poured water into both of them. The water in the cup filled with sand will take much longer to reach the bottom than the one with rocks because the rocks allow water to flow swiftly to the bottom due to the significant gaps between them.
This is the reason your grind size directly affects the pull time. If your espresso machine is automatic, hunt for the calibration knob or button to dial in on the right setting. Remember, if your shots look and taste weak, crank the calibration knob towards “finer.”
You are not using a scale.
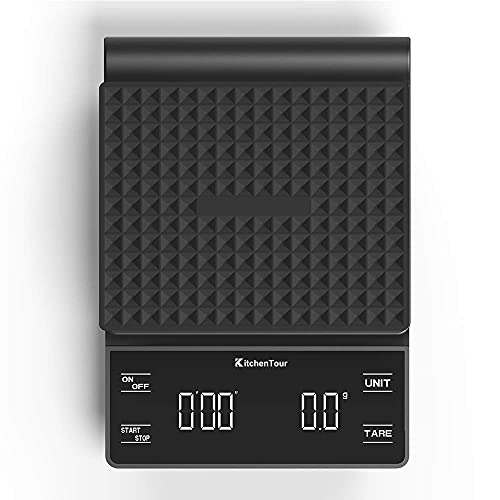
If you are not using a scale, you will have no control over your grind size, which means you can’t make adjustments. Stop buying pre-ground beans and get yourself an affordable scale.
Finding the correct measurement for your specific equipment will ensure consistently tasty shots. Coffee scales can be relatively inexpensive; you can easily find a cheap but dependable one online.
- #PRECISE MEASUREMENT & WIDE RANGE# – KitchenTour EK6002 defines the latest in precision weighing technology with a weight capacity from 0.3g – 3000g to help you measure and get an exceptional cup of…
- #MULTI-FUNCTIONAL COFFEE & FOOD SCALE# – The electronic coffee scale has a built-in timer to cook and time your coffee to ensure the consistency of each cup of coffee. With Tare Function, You can add…
- #SUPERIOR QUALITY MATERIAL# – This Kitchen Drip Coffee Scale is crafted to be sturdy, accurate, safe, and user-friendly. Constructed with a high-quality ABS platform and frame, this digital kitchen…
The temperature is set incorrectly.
The ideal temperature to brew your espresso beans is around 200 degrees Fahrenheit. If the water being pushed through your grinds is not hot enough, you can expect your shots to taste weaker than unusual. The hotter the water, the more flavor will be extracted from the beans.
You are not tamping correctly, and your espresso puck looks wrong
An espresso tamper is a metal tool used to place pressure on the grounds inside the espresso basket. Make sure the grounds inside your basket are level before utilizing your tamper. Wipe away any espresso that does not sit flush with the basket.
Take your tamper and slowly lean your weight into the grounds. You must do this correctly to ensure that the grounds are evenly distributed and do not contain minuscule air pockets. After you pull your shots, examine the spent grounds in your basket (which is known as an espresso puck).
If your puck is watery or doesn’t look uniform because it contains holes, something probably needs to be adjusted.
- WHY NORMCORE Spring-loaded Tamper? Whether you are a novice or an experienced barista, it is always a challenge when comes to coffee tamping. Traditional coffee tampers are prone to skew or…
- Upgraded features from V3: This V4 tamper has further improved on the central shaft design, also the interchangeable springs (15lb/ 25lb/ 30lb) are now applicable to the central shaft which provides…
- Fits 54mm Breville Portafilters: Designed to fit 54mm Breville Portafilters which are tapered (Suitable Breville/Sage models including the Barista Express, Pro, Touch, Bambino Plus, Infuser, and…
Final Notes
Don’t lose your patience. The perfect espresso shot is the product of many different elements working together, and if one of those elements is off, chances are your shots will be off too. Keep making tweaks and adjustments; play around with the calibration and grind size.
If you still end up with watery espresso, revisit this checklist and give it your best shot (no pun intended).
- Use fresh espresso
- Employ a darker roast
- Adjust your grind size
- Check the temperature
- Use a scale to measure your espresso
- Tamp effectively
- Clock the pull time
- Examine your spent pucks


